Project Development
1.
Our team Chemical Device
·
In this section, I will briefly
describe my team chemical device.
·
What it is. What problems will
the chemical device solve?
·
Below is the hand sketch of the
chemical device.
My team’s
chemical device is an Automated Door Handle Sanitizer.
Problem:
Due to the large
spike of covid-19 cases early 2022 in Singapore, patients who have contracted
Covid-19 frequent the hospitals a lot. Covid is transmitted through high touch
surfaces, one of which are door handles that is frequently used by everyone,
with or without Covid-19.
What is it:
Similar to that
of an automatic hand sanitizer, our chemical product will be for door handles.
Hence, it will disinfect the door handle which will make the handle safe for
the next user and will be able to sanitize the handle after every use.
What will our chemical device solve?
This chemical
device will solve the problem of having unsanitized door handles that are
frequently used or touched by Covid-19 patients, which will just reduce the
transmission rate and potentially reduce the number of cases. Because hospitals
are frequented by a lot of Covid-19 patients, this product will be created and
used in a healthcare setting.
Here is the sketch of our product:

There are 3 main
bodies in this product,
1. Top part (to house the servo and cover the tube and tank
2. Tank (to
store the sanitizer)
3. Bottom casing(to store the electrical circuit and the Arduino board, as well as the Tank)
Here is the
sketch of the individual bodies

2. Team Planning, allocation, and execution
Below shows the
team allocation.
Next is
the Bill of Material
|
Project Title: |
How can we help hospitals sanitise door handles to prevent
COVID-19 |
||||||
|
Team members: |
Jasmine Chan Sze Yi 2111335 How Weng Yan 2122122 Glenn Michael Khoo Zhi Yi 2122544 Mohd Hariz 2122375 Neo Jun Xian, Tristan 2122528 |
||||||
|
Created by: |
How Weng Yan 2122122 Jasmine Chan Sze Yi 2111335 |
||||||
|
Date created: |
22/11/2022 |
||||||
|
BILL OF
MATERIALS (BOM) |
|||||||
|
No |
Description
of item |
Supplier
|
quantity |
quantity
unit |
unit
price (SGD$) |
Total
Cost (SGD$) |
Available
at W319 Lab? (Y/N) |
|
1 |
Arduino Uno Kit |
2 |
pieces |
25 |
50 |
NIL |
|
|
2 |
Infrared sensor module |
https://sg.cytron.io/c-sensor/c-optical-infrared-sensor/p-infrared-sensor-module |
1 |
piece |
0.68 |
0.68 |
Y |
|
4 |
Blue PTFE tube- inner diameter 2mm outer diameter 4mm |
https://sg.cytron.io/p-blue-ptfe-tube-inner-diameter-2mm-oute-diameter-4-mm |
1 |
piece |
1.50 |
1.50 |
N |
|
5 |
Submersible Pump Water Pump DC 3V-5V |
https://sg.cytron.io/p-micro-submersible-water-pump-dc-3v-5v |
1 |
piece |
1.39 |
1.39 |
Y |
|
6 |
Clear acrylic 2mm Rectangle/Square - Laser cut 813mmx457mm |
https://www.acrylic.com.sg/on-line-acrylic-cutting/clear-acrylic/ |
1 |
pieces |
30 |
30 |
Y |
|
7 |
3D Printer Filament, 1.75mm Dia, Grey, PLA, 500g |
https://sg.element14.com/multicomp/mc002549/3d-printer-filament-pla-1-75mm/dp/2845496 |
250 |
g |
29.33/1kg |
7.33 |
Y |
|
8 |
SG90 Micro Servo |
https://sg.cytron.io/c-motor-and-motor-driver/c-dc-motor/c-servo-motor/p-sg90-micro-servo |
1 |
piece |
2.90 |
2.90 |
Y |
|
Grand Total Cost: |
93.8 |
|
|||||
Next up will the Gannt chart
3.
Design and Build Process
In this section, I will provide documentation of the design and
build process. Here is the task allocation of my group:

This is the original sketch of all the cardboard
·
Jasmine and Weng Yan will take
charge of the Computer Aided Design on Fusion 360
·
Glenn is in charge 3D printing
·
Tristan is in charge of Arduino
Programming
·
I will be helping out Glenn and
Tristan.
· I also helped create and 3D printed the nozzle.
Part 1. Design of
cardboard prototype (done by everyone).

With the sketches done, we started to cut the cardboard
Firstly, we did an outline of the outer casing and cut out the outer
casing

Secondly, we did an outline of the tank and cut out the tank


Next, we did and outline of the top casing and cut it out

The hole at the centre is for a straw to simulate the pipe for the
sanitizer to be pumped out

Once we had all the parts, we had to assemble them and glue them together.
Here is the assembly for the outer casing and the tank

Lastly, the assembly for the top casing. (bottom view)

Of course, this is just a prototype, the final product will be in acrylic. To get these parts in acrylic, we had to laser cut them in Library Makerspace, which was done by Weng Yan and Jasmine.
Part
2. Design of Outer Box and Tank CAD (done by Jasmine)
https://cp5070-2022-2b04-group1-jasmine-chan.blogspot.com/p/project-development.html
Part 3. Design of Top Cover CAD (done by Weng Yan)
https://cp5070-2022-2b04-group1-how-weng-yan.blogspot.com/p/project-development.html
Part 4. Design of Nozzle (done by ME, Hariz)
Firstly, well, the chemical product utilizes alcohol to sanitize the
door handle, and of course we can’t just spray the door handle like a normal
hose, thus, I created this nozzle such that the spray area is a lot wider so as
to reduce waste of the sanitizer as well as to ensure that more surface area of
the handle is covered. Now are the steps of the design.

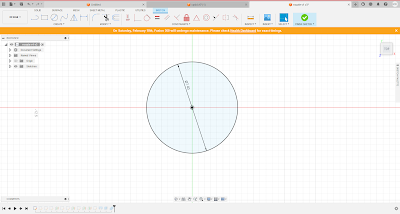
Step 1: I created a sketch, and within that sketch, I used the
“Circle” function to create a circle of about 7.4mm in diameter. I made sure
that the origin of this circle is also the origin of the plane for easy
reference. The opening of the tube is about 7.4+ mm, so this diameter is
selected to go over and cover the nozzle and also ensure a tight fit.
Step 2: I created another sketch, but this time, I used the “Spline” function, under "create" in sketches, to create a long oval, but lesser than the diameter of the circle. I also made sure that the centre of this oval is also the origin of the plane I created this sketch on, to cross refer to Step 1 and make sure that it is aligned.
Step 3: Replicate Step 2, but shorter length, same breadth.
Step 4: By using the “Move” function under "Modify", bring the smaller oval created in step 3 and increase the height to 15mm.


Step 5: Extrude the circle created in Step 1 to about 15mm.

*For step 4 and 5, the height of 15mm was chosen so that there is allowance for us to remove and to grip the nozzle, as well as to ensure that the tube can really get a tight, snug fit onto the nozzle.*
Step 6: By using the “Loft” function under "create", select the surface area
of the larger oval at the bottom from step 2, then select the surface
area of the smaller oval from step 4, 15mm above the larger oval. This
will create a shape similar to that of a vacuum head.

Step 7: Move the two bodies until they intersect each other as shown below.

Step 8: Select “Combine Body” function under "Modify", select the 15mm Cylinder
from Step 5 as the main body, then select the vacuum-head body created in Step
6 as the "tool body". Under operation, select “Cut” and there will now be an
opening in the cylinder pipe that will diverge from top to bottom. ( you can see a tint of red to show that the vacuum head body is being cut from the main )

Voila, the nozzle is created.

Part 5. 3D Printing of Tank and Nozzle(done by Glenn).
https://cp5070-2022-2b04-group1-glenn.blogspot.com/p/project-development.html
Part
6. Programming of infrared sensor, LED, servo and pump (done by Tristan).
https://cp5070-2022-2b04-group1-tristan.blogspot.com/p/project-development.html
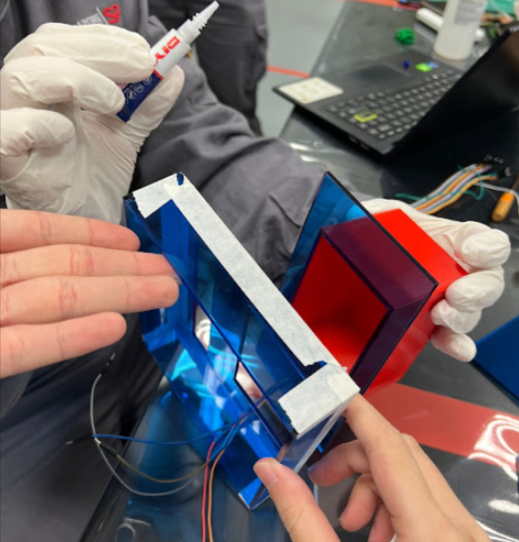
Part 7. Integration of all parts and electronics (done by everyone)
Firstly, we
assembled the outer casing and glued them together, followed by taping the
corners to secure it after gluing it together.

Next, we had to
remove the newly printed tank, followed by supergluing it to the middle sheet
to the tank

Next is the
assembly and gluing of the top casing,

Here is a video of us piecing it together
HERO SHOT with the
finalized product

Product in action here
4.
Problems and solutions
In this section I will describe the problems encountered in the design and build process and how the team solved them.
Here is the list of problems encountered during the design and
building process
1.
First problem: Tank was flimsy
and was leaking when tested
Solution: Reprinted a new tank with better quality and switched to the
Ultimaker S3 instead of using the Creality Ender 3 3D printer.

2.
Second Problem: high volume of
sanitizer pumped out
Solution: Reprogram the code to make reduce the time when the pump is turned on
3.
Third Problem: Circuit problems
1st problem of the circuit: wrong connection of sensor, reversing
the polarity and frying the sensor.
Solution: Resorted to getting a new sensor.
2nd problem of the circuit: Current flowing through pump without
additional parts were not enough to power the pump.
Solution: The pump we needed required spare parts, which did were not included
in the package given to us.
3rd problem of the circuit: Added battery caused the servo to
malfunction.
Solution: Positive and negative of the servo was connected to the Arduino
instead of the breadboard.
Problem with the system integration: Servo could not fit into top part

Next
up is some limitations of our product after integration
1.
Battery power issue
2.
Top casing did not consider size of servo
3.
Tank is not covered
4.
Size of the product is too big.
Project Design Files as
downloadable files
Files used for
laser cutting (.dxf file)
CAD file for the sanitiser
Arduino file
5. Below is my Learning
Reflection on the overall Project Development.
Overall, I feel that the entire journey from start to end is very meaningful and will definitely be very helpful for me in the future, especially for the Capstone Project in Year 3. This project really broadens my perspective on product design because of how intricated the entire process actually is… Initially, I thought that product design is very straightforward, figure out a topic/target audience to focus on, followed by the entire ideation process, prototyping and then finalized product, but to my surprise, while the whole product design is a summarized version of what I just listed out, the entire process is actually a lot more detailed and more complex. In fact, coming up, creating and finalizing a product will really take quite a lot of time to complete, which really amazes me because of how fast big companies are able to come up with such products in a short amount of time, yet are able to yield high revenue.
In relation to this project, the entire journey will definitely be remembered, especially how memorable this entire process really is and will give me a basis to work with when I have to create any product I desire, or rather, it will act as a stepping stone and guide me throughout the entire product design phase in the near future.
While I am not good at it, I am thankful that this module also briefly introduced Arduino programming to me and I was able to apply it in this project, with massive help from Tristan. That being said, programming is interesting, but I would not consider it my forte and the learning curve for it will be steep. That being said and to be very honest, I did not expect to touch on any sort of coding at all in this course, even though it is one of the easiest or simplest to do among the other languages.
One thing that really sticks out for me is
the 3D printing part and CAD on Fusion 360. Going through this process has
reignited my interest in 3D printing as well as designing on Fusion 360. I have
to admit, the design of the nozzle is extremely simple and it gets the job
done, but I do wish that I could have made it more intricate and aesthetic,
instead of it being a normal cylinder. Moreover, with the designs I see online,
like on Thingiverse, it has brought to my attention that I can definitely.
Oh, I also have to be honest, while I am assigned the role of COO, I feel that I definitely did not set the pace of the project or rather, I feel that I did not do enough as the COO. Thus, I also have to make sure that in the future, when I am assigned a role, I have to take it more seriously and really fulfil my role as per described. However, while I did enjoy the entire process of this project, I definitely feel that being in this role may not be my thing, but who knows? Time will tell..
Well, at last, you have come to the end of my
blog entries, thank you for reading and goodbye!
Comments
Post a Comment